Lesson 1 – Servers I: Accessing DSMLP
All lectures will be delivered as readings that you complete on your own time. Post questions with the lesson here.
Make sure to read this article before moving on to Methodology Assignment 1.
Make sure to also complete the Welcome Survey and submit it with Methodology Assignment 1!
Table of contents
Local Development vs. Remote Development
Introduction
In your coursework so far, the majority of the projects you’ve worked on were likely small enough in scale that you were able to run them entirely locally, i.e. on your personal computer. However, as your projects grow in scale and complexity, and your datasets grow in size, you will need to start resorting to more powerful servers to perform your computation. You will access servers remotely through your personal computer.
Servers are great, as they give you access to RAM, CPU, and GPU resources that far exceed those of your personal computer. In addition, it’s possible to let your code run on a server for days or weeks if necessary, which would be wildly inconvenient to do on your personal computer (imagine not letting your laptop go to sleep for a whole week 😴).
However, just because you have access to a server doesn’t mean you won’t need to write or run anything on your personal computer. After all, it’s far more convenient to run code on your personal computer than it is on a server, in part because your personal computer likely already has all of the packages it needs to run your project.
So then, when should you run code on your personal computer vs. on a server?
Example
Let’s suppose you need to train a model on 1 TB of training data. On the server, it will take ~24 hours to run (it would be impossible to train this model on your personal computer – it would take far too long). How do you go about training your model?
Here’s one solution:
- Get access to a large, expensive, remote GPU cluster and run
train.pyon it. - A day later, notice a bug in
train.py, meaning all outputs are invalid. (This will happen to you!) - Re-run
train.py. - Repeat steps 2 and 3 until you’re satisfied. By the time your code works as intended, weeks will have passed and many dollars will have been spent on computing resources.
It is easy to fall into the trap of following the steps above. In fact, the same scenario can occur when working with a large dataset locally – you’ve likely re-run a piece of code locally several times and waited minutes for each run, tweaking small things after each run.
There’s a better solution:
- Develop your code locally on a small, representative set of your training data (for instance, a sample of 10,000 rows).
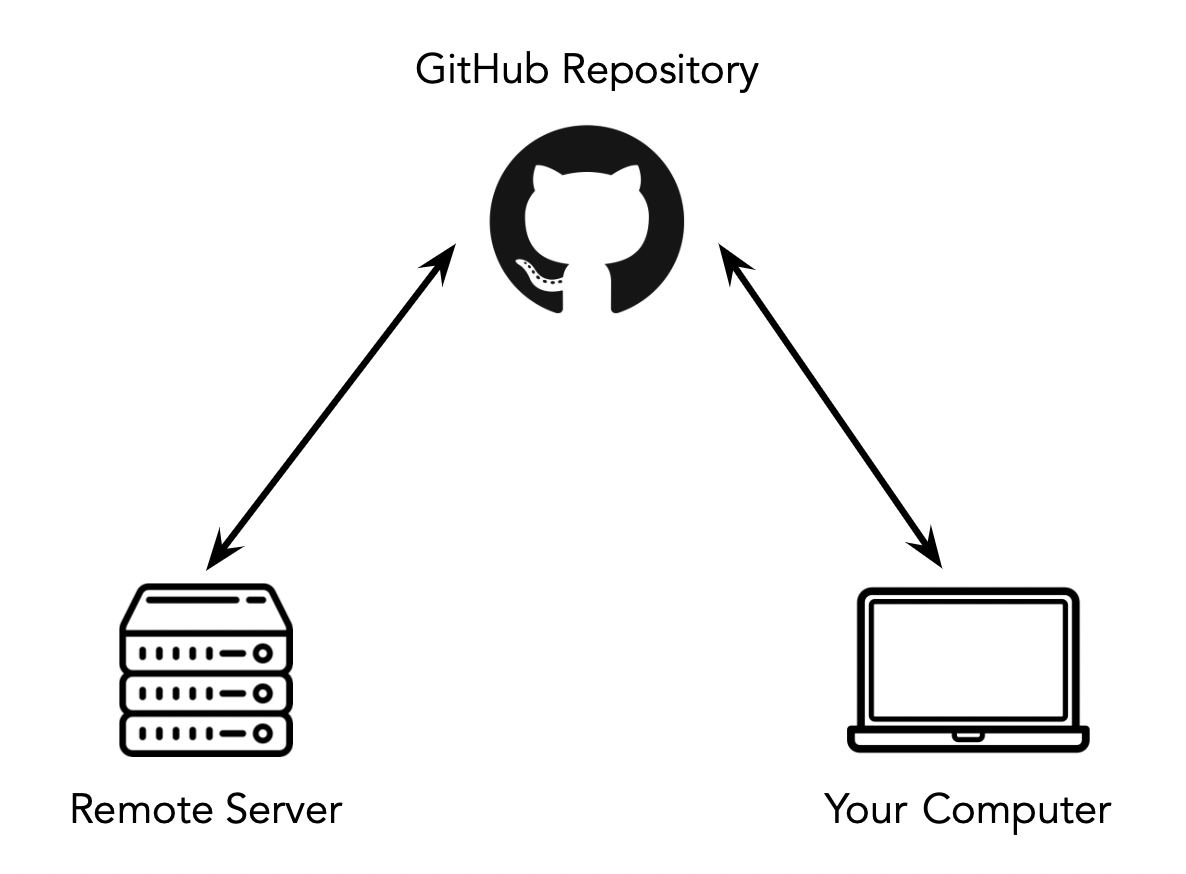
- Once you’re content with your code, push it to GitHub from your personal computer, and pull it on the GPU cluster.
- Run
train.pyonce on the GPU cluster and be happy with the results!
Moral of the story: don’t run under-tested code in production.
Guidelines
In order to run your code both on your personal computer and on a server, here are a few things you’ll need to keep in mind:
- Your code needs to stay up-to-date in both places. As such, make frequent commits when developing your code on your personal computer. We’ll talk more about Git later on in the quarter, but you’ve likely already used the most basic features like pushing and pulling; those should suffice for now.
- Remote servers typically don’t have graphical user interfaces, so you’ll need to use the command-line (bash), both generally and to interface with GitHub, since GitHub Desktop typically won’t be available. (Note that the server that we will use does provide access to Jupyter Notebooks and VS Code, as we will see shortly.)
- Your code needs to be able to run on both your personal computer and on the server. This means that you need to have the same versions of programming languages and packages in both places, i.e. that your methods need to be reproducible. Docker is a tool that will use towards the end of the quarter to solve this issue.
DataHub and DSMLP
You’ve already used a remote server in your data science classes before – DataHub! DataHub is a campus-hosted server that allows you to run Jupyter Notebooks. In fact, DataHub also allows you to use JupyterLab, a full-fledged IDE that contains a Terminal, a Python console, and a text editor, among other things. (Since there’s a Terminal, you can use Git to access your work.)
However, DataHub shuts down after 30 minutes of client inactivity, which makes it impossible to run jobs that require hours to run. In addition, most DataHub configurations only have a small amount of RAM and CPU resources, which won’t be sufficient for our purposes.
As such, we will not be using DataHub!
Instead, we will be using UCSD’s Data Science and Machine Learning Platform (DSMLP). It turns out that DataHub is run on DSMLP, so in some sense you’ve already used it. However, you access DSMLP via the command-line, e.g. the Terminal. In the next section, we’ll look at exactly how to do so.
One of the advantages of learning how to work with DSMLP now is that many of the skills you gain will easily translate to other cloud computing services, like AWS, GCP, and Azure. To be precise, DSMLP is a Kubernetes cluster on which you can run processes in Docker containers; a Docker container is a package that contains everything needed to run an application (e.g. specific code, tools, and libraries), and Kubernetes is a tool that “orchestrates” containers, making sure each one has access to the resources it needs. We’ll learn more about both of these tools in the coming weeks.
You may already know the basics of working in bash (the language used at the command-line) from DSC 30, DSC 80, and your upper-division coursework. If you’d like some refreshers, look at our in-house Command-Line Cheat Sheet, or the cheat sheets at educative.io or devhints.io.
Accessing DSMLP
The following video demonstrates much of what is discussed below, but still read the entire lesson – the video doesn’t cover every single detail you’ll need to know!
Basics
Here, we will cover the basics of accessing DSMLP. For more advanced usage, see campus documentation, and in particular the FAQ, which are very detailed. We’ll also cover more in-depth behavior (e.g. how to use GPUs, how to run jobs overnight without having to keep your Terminal open) in next week’s lesson.
Let’s start with the basics.
Step 1: Open your Terminal and run ssh <username>@dsmlp-login.ucsd.edu, where <username> is replaced with your official UCSD username. For instance, Suraj would run ssh srampure@dsmlp-login.ucsd.edu. Enter your password when prompted. |
If you did this correctly, you will likely see a message that’s something along the lines of
Hello srampure, you are currently logged into dsmlp-login.ucsd.edu

You are using 0% CPU on this system
Now, you’ve been placed into an initial “jumpbox” server. Think of this initial server as the lobby of a hotel – you could sleep here, but you probably want an actual room, i.e. an actual server. To specify which actual server we want to use, we need to run a launch script.
- There are several default launch scripts that exist, that initialize pre-configured servers with common tools pre-installed (like
pandasand Jupyter Notebooks). When using a default launch script, there will always be some default amount of RAM, CPU, and GPU resources allocated, but you can provide flags when running the launch script to change these. - You can also create a custom launch script to initialize a custom environment with your own packages. We will see how to do this later.
Step 2: Now, in the same Terminal window enter launch-scipy-ml.sh -W DSC180A_FA23_A00. |
This will initialize a server with 2 CPUs, 8 GB of RAM, and no GPUS, which are the default settings for the launch script launch-scipy-ml.sh. If we instead wanted to ask for 8 CPUs and 32 GB of RAM, we could have run launch-scipy-ml.sh -W DSC180A_FA23_A00 -c 8 -m 32. This is not the only script that exists; for instance, we could have used launch-scipy-ml-gpu.sh. See this page for more details.
The -W DSC180A_FA23_A00 tells DSMLP that we’d like to use the DSC 180A workspace, which means that you’ll be able to access any files that we choose to share with the whole class, or your even just your specific section. For instance, if your mentor has a really large file they’d like your entire section to be able to access, they can upload it to DSMLP once and, through the DSC180A_FA23_A00 workspace, all students in your section will be able to access it. This prevents each of you from having to transfer the file to DSMLP individually. Note that space on DSMLP is not unlimited; to view the amount of disk space you have left, navigate here, and at the /hub/spawn page, select the Services Tab > “disk-quota-service”.
There are a variety of flags that you can use with a launch script; we covered a few above (-W, -c, -m) but you aren’t expected to memorize them all. Instead, if you use -h (e.g. launch-scipy-ml.sh -h), you’ll see all of the possible launch options.
Once you’ve run the launch script, you now have access to a computer with the resources mentioned above! Note that the server runs Linux, so all of the command-line commands you use should work on Linux (not necessarily Windows or macOS). See the Command-Line Cheat Sheet for more tips.

Jupyter Notebooks and DSMLP
After running the launch script, you should see a link to a Jupyter Notebook at the very bottom of your Terminal window. For instance:
You may access your Jupyter notebook at: http://dsmlp-login.ucsd.edu:12733/user/srampure/?token=ce5cfea8c9a8892593868b91ddc55b21ff61220989eb17d6ee303c6604609009
If you copy the link that you see in your Terminal and try to open it in your web browser, you will likely get an error. To access this Jupyter Notebook, you need to follow one of the following two options.
Option 1: Port Forwarding (recommended)
Let’s take a closer look at the example link provided above.
http://dsmlp-login.ucsd.edu:12733/user/srampure/?token=ce5cfea8c9a8892593868b91ddc55b21ff61220989eb17d6ee303c6604609009
Here, there are two components:
- A port,
12733in this case, which appears right afterdsmlp-login.ucsd.edu:(your port may be different). - A token,
ce5cfea8c9a8892593868b91ddc55b21ff61220989eb17d6ee303c6604609009in this case (your token will be different).
Now, open a new Terminal window on your personal computer, without closing the old one. This step is crucial – make sure that the name at the start of your command prompt is your personal computer’s name, not your username on the server. In that new Terminal window:
- Enter the command
ssh -N -L 8889:dsmlp-login.ucsd.edu:<port> <user>@dsmlp-login.ucsd.edu.- For instance, Suraj might enter
ssh -N -L 8889:dsmlp-login.ucsd.edu:12733 srampure@dsmlp-login.ucsd.edu.
- For instance, Suraj might enter
- After entering your password, if you see nothing, you’re on the right track. Open
http://localhost:8889/user/<username>/tree/on your personal computer, again with<username>replaced with your own username (say,srampure) When prompted for a “Password or token”, enter the token you just found. You should then be good to go!- If you change
treetolabin the URL, you’ll be brought to Jupyter Lab, the latest version of the Jupyter Notebooks interface. Jupyter Lab is an IDE, complete with a Terminal and text editor. - If you see an error message saying
channel 2: open failed: connect failed: Connection refused, you are likely entering the wrong port number or the same port is being used elsewhere on your computer, like in another Terminal window.
- If you change
- To disconnect:
- Stop your Jupyter instance, by either hitting the Quit button in the top-right corner of the Jupyter home page or entering
exitin the Terminal used to launch the container. - Switch to the Terminal that is open on your personal computer (the one where you ran
ssh -N -L ...) and hitCtrl+Con your keyboard (regardless of your operating system) to kill the port-forwarding process.
- Stop your Jupyter instance, by either hitting the Quit button in the top-right corner of the Jupyter home page or entering
Option 2: Using the Campus VPN
If you choose to go this route, follow the instructions here. Note that there are two versions of the UCSD VPN – one that works just in the web browser and one that works for your entire OS. Use the latter, since you’ll be working in the Terminal. (If you have an Apple Silicon Mac, you can follow the Mac instructions listed there, even though they say they’re for Intel Macs only.)
SSH keys allow you to skip the step of entering a password each time you’re accessing DSMLP. Follow the steps here to set them up. This only takes 2 minutes, but saves a ton of time, especially if your UCSD password is something long and cryptic.
Transferring Files to DSMLP
There are multiple ways to transfer files to/from DSMLP. This article covers several strategies; we’ll talk about two of them here.
Option 1: Using GitHub
Once you’ve logged onto DSMLP, you can use Git and GitHub from the command-line. Refer to this guide by GitHub for tips.
You may need to set up a personal access token to access your GitHub account from the command-line (not just on DSMLP, but on your own computer as well); see this guide by GitHub. Another useful resource here is this guide written by former DSC student Scott Yang.
Finally, just as you can set up SSH keys for DSMLP, you can also set them up for GitHub. Doing so will allow you to push and pull from private repositories without needing to enter your username and password or personal access token each time. See this guide by GitHub for more details.
Option 2: Using scp
The bash command scp allows you to transfer files to/from a remote server. For example, scp dog.txt srampure@dsmlp-login.ucsd.edu:test.txt copies the file dog.txt from your local machine to Suraj’s DSMLP drive. The video above gives a practical example, including a demonstration of how you might copy multiple files at once.
Accessing Section-Specific Data
Some mentors have coordinated with the methodology staff and DSMLP to provide only the students in their section access to data on DSMLP. This data lives in section-specific folders that only the students in their section have access to.
Here’s how to launch a server on DSMLP in a way that you can access this section-specific data. For the purposes of this example, we will assume you want to use the vanilla launch-scipy-ml.sh launch script, but these steps work with any launch script and flags. Also, note that here “team” and “section” mean the same thing; by “team” we don’t mean your project’s team.
sshonto DSMLP as usual. Don’t run any launch scripts yet.- Run
launch-scipy-ml.sh -W DSC180A_FA23_A00 -G list. Note that this won’t actually launch a server – instead, this will list all of the groups you are a part of. You should see a row that contains your capstone section number for the “Team,” likeDSC 180A - A14 [88137]in the example below. Copy the “Team ID” (dsc180aa1488137100014352in the example below).
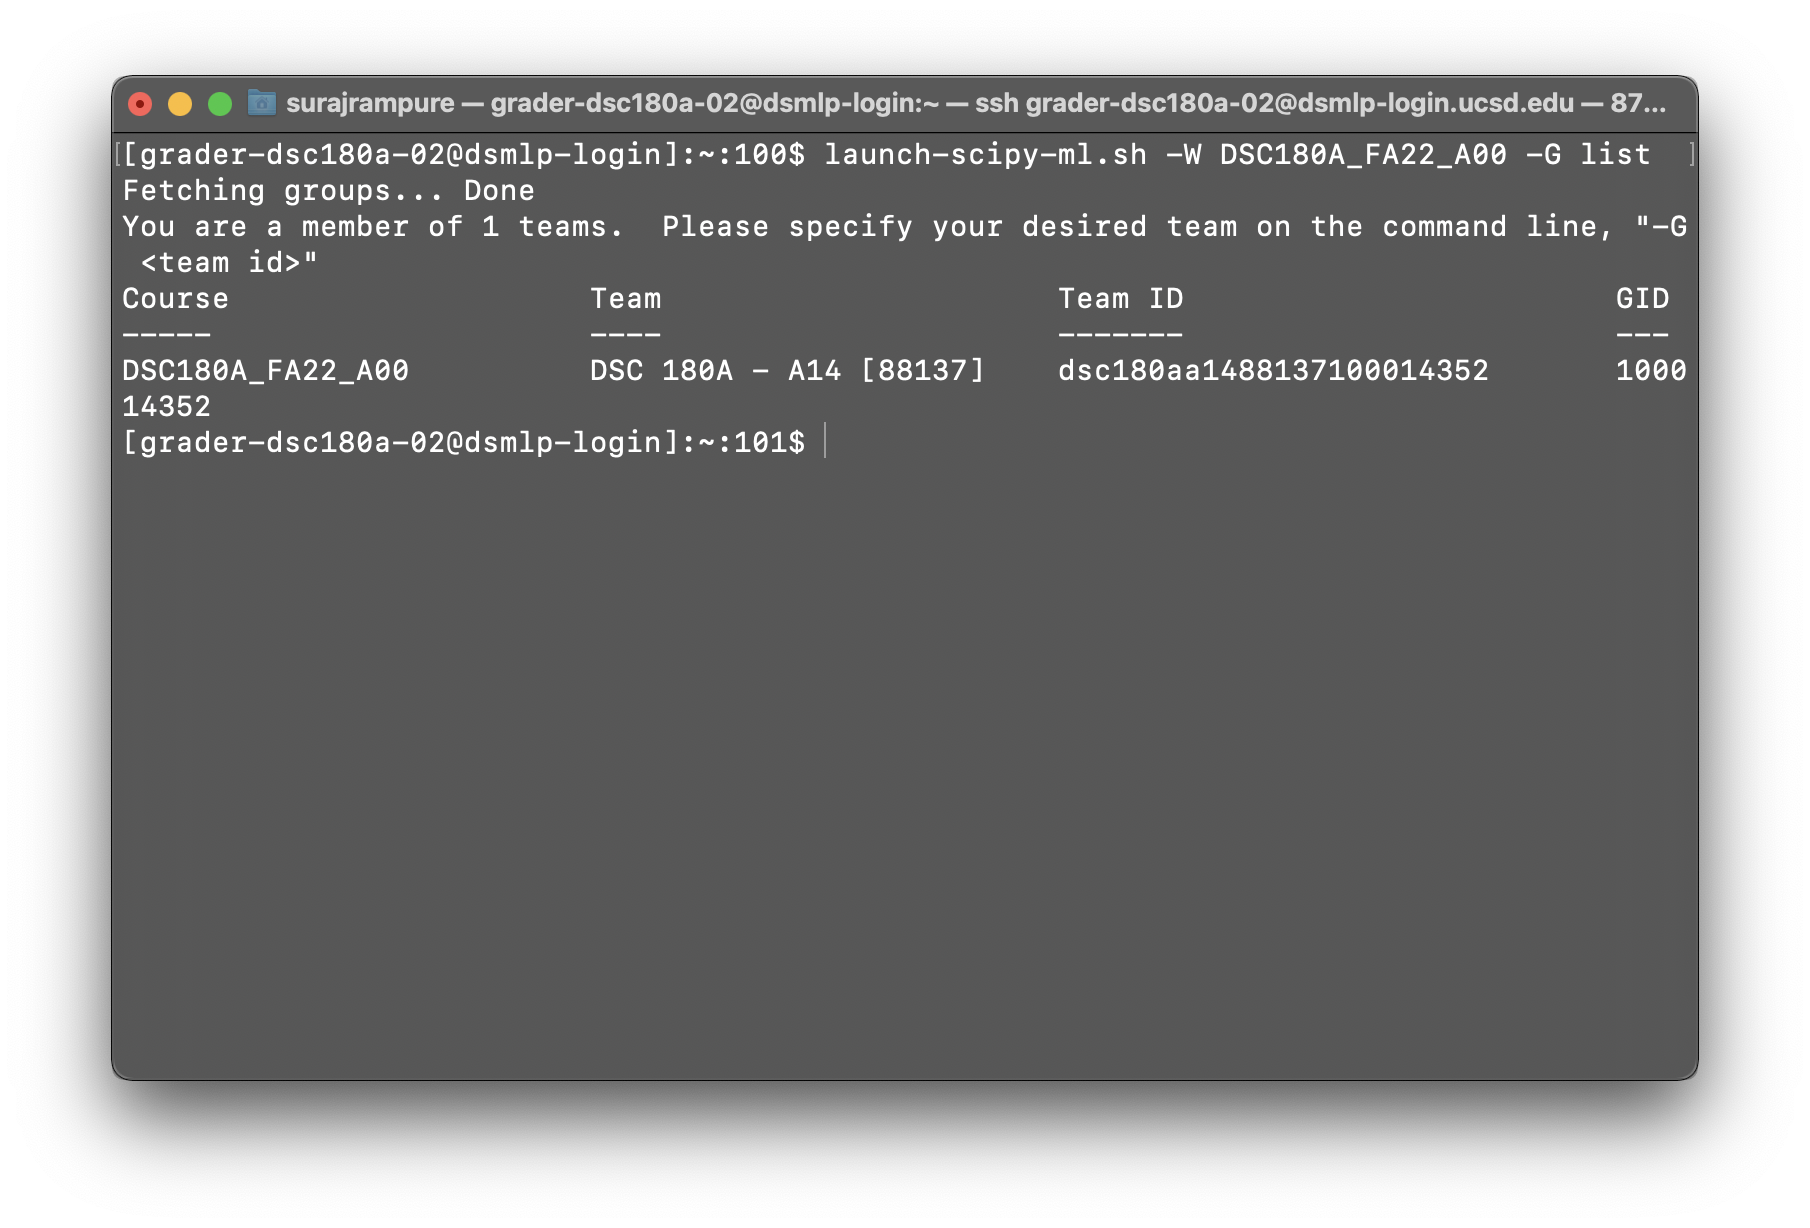
This example is from Fall 2022, but the principle is the same.
Note: If you don’t see the right team information at this step, contact Suraj.
Run
launch-scipy-ml.sh -W DSC180A_FA23_A00 -G <teamid>, with<teamid>replaced with the Team ID you copied earlier. If you’re in section A14 like in the example above, you’d runlaunch-scipy-ml.sh -W DSC180A_FA23_A00 -G dsc180aa1488137100014352.After your server launches, run
ls. You should see three folders –private,public, andteams. Your home directory is inprivate(that’s where all your code should live). Thepublicfolder contains files that the methodology course staff may share with the entire course.To find your section-specific data,
cdintoteams. Runlsto see a list of all of the teams in the course and identify the name of yours. This may look like the example below. If, again, you’re in section A14, your team-specific folder is"dsc-180a---a14-[88137]"(the quotes are important). If youcdinto that folder, you’ll see the files that your mentor uploaded for you!
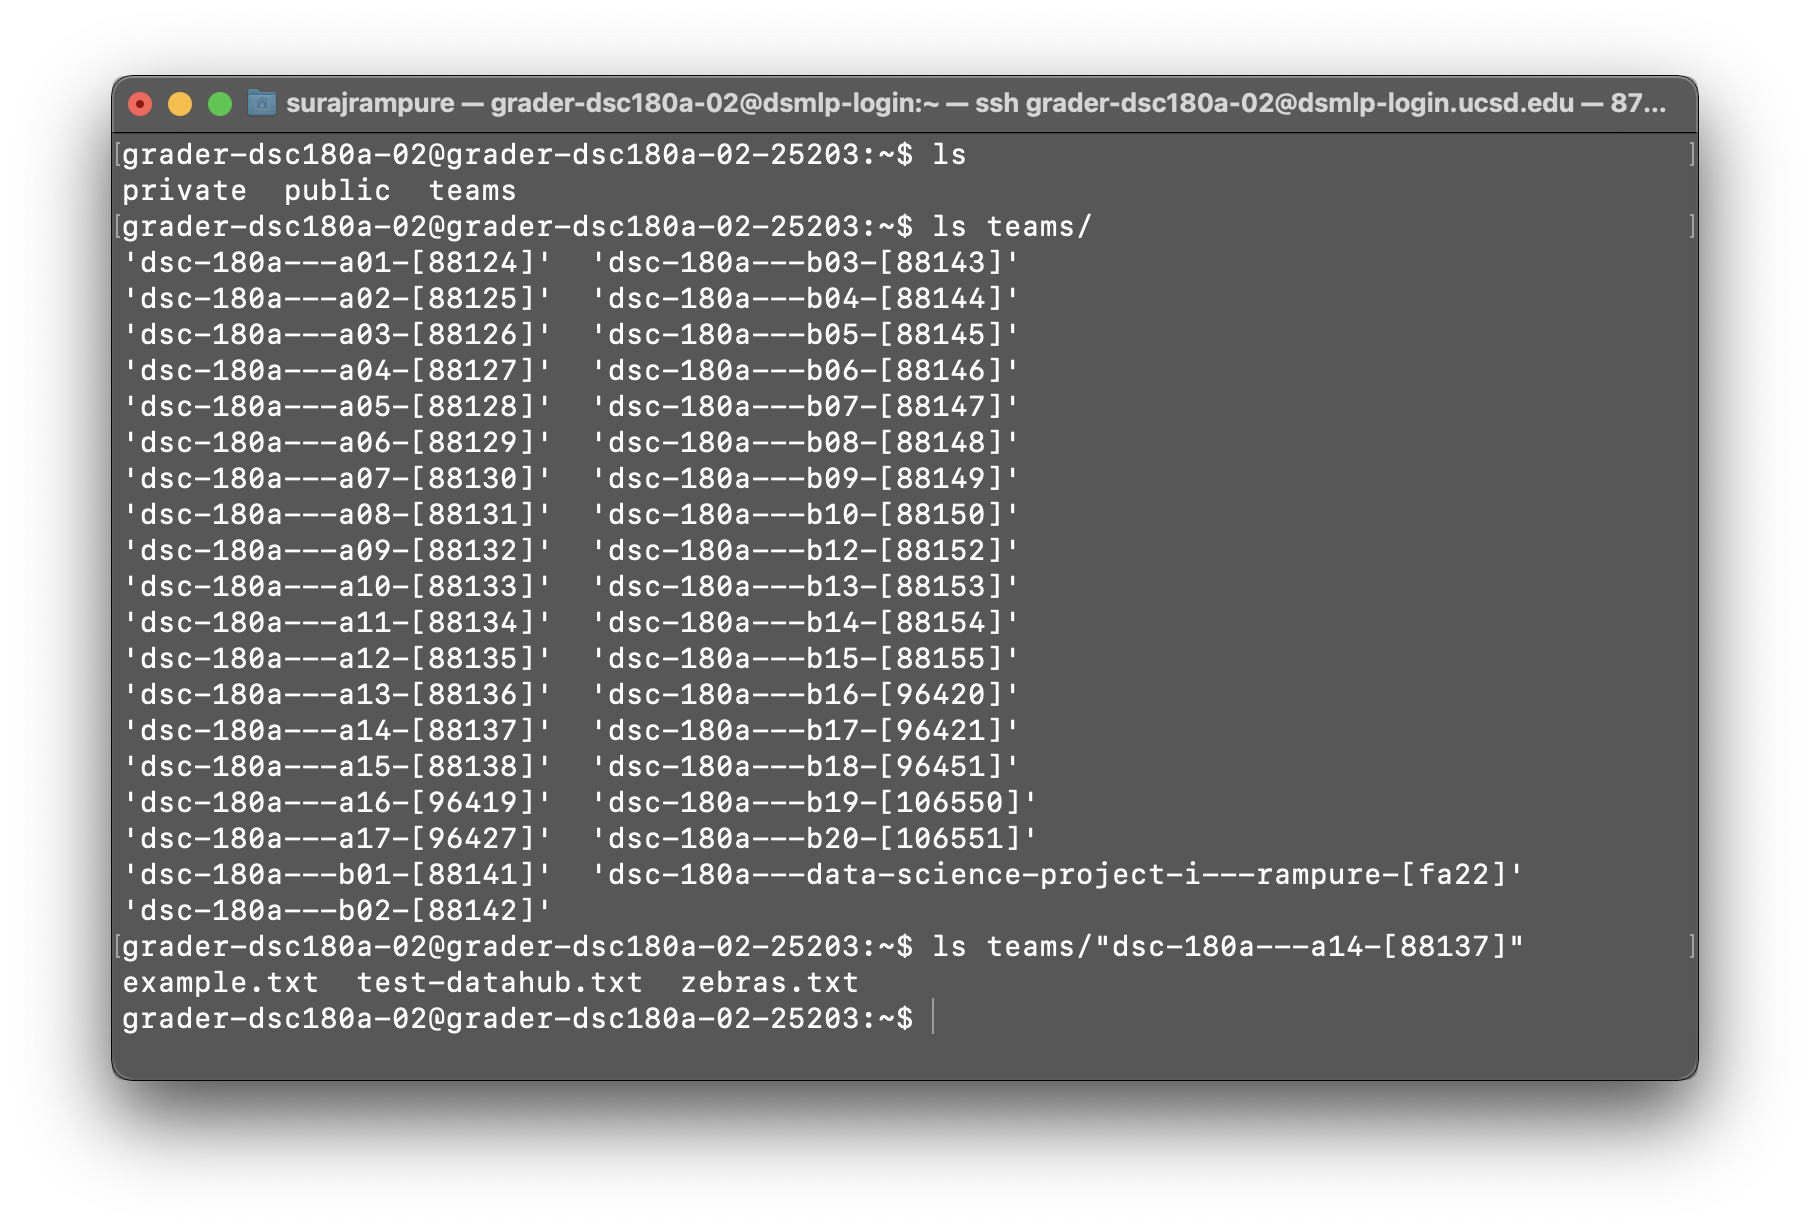
All you need to do now is access the data in your team’s folder from your code in the private folder! For instance, from a script at the root of your private folder, a path to a file in your team’s folder might be "../teams/dsc-180a---a14-[88137]/example.txt".