🛠 Environments and Containerization
Methodology Lesson 8 + Methodology Assignment 6
Like in Week 7, this week’s Methodology Lesson and Methodology Assignment are combined into a single document, structured as a tutorial. The part that needs to be submitted is marked very clearly below. Submit your work for the Methodology Assignment 6 portion to the portal on Gradescope by Wednesday 12/13.
Please fill out both the official Student Evaluations of Teaching (by Saturday 12/9 at 8AM) and the End-of-Quarter Survey (by the end of finals week). Thank you for your feedback!
Table of contents
Overview
At this point in your data science career, you’ve likely run into one of the following scenarios:
- A project ran fine on your computer, but not on your colleague’s – it either produced incorrect results, or resulted in errors, like
ModuleNotFoundError: No module named 'numpy'. - When installing a package, you saw the message
Incompatible library version: requires version a.b.c or later, but you currently have version x.y.z. When you fixed that, some other application broke. - You needed to run your code on a more powerful server (say, AWS), but you weren’t sure how to set up all the packages you needed on that server.
The primary ask we have of the code you write in the capstone (and beyond) is that it’s reproducible. That is, in the repositories you submit (both in Quarter 1 and Quarter 2), there should be a README file that describes exactly how to run your code. This file should include a method for replicating the software environment necessary to run your code. In this lesson, we’re going to look at two techniques for creating software environment – conda environments and Docker containers. Both solutions will allow you to bundle the necessary software with your projects so that others are able to run your code without any issues.
In previous years, all students were required to use Docker containers for their code. We’ve relaxed this requirement this year, but are still requiring all students to include instructions on how to replicate the necessary software environment in their repos’ README files.
🎥 Conda Environments
First, before conda environments, it’s worth discussing vanilla Python virtual environments. These are created using the built-in package venv. From the documentation, a virtual environment is (amongst other things):
- Used to contain a specific Python interpreter and software libraries and binaries which are needed to support a project (library or application). These are by default isolated from software in other virtual environments and Python interpreters and libraries installed in the operating system.
- Contained in a directory, conventionally either named
venvor.venvin the project directory, or under a container directory for lots of virtual environments, such as~/.virtualenvs. - Not checked into source control systems such as Git.
- Considered as disposable – it should be simple to delete and recreate it from scratch. You don’t place any project code in the environment
- Not considered as movable or copyable – you just recreate the same environment in the target location.
In data science projects, though, vanilla virtual environments are rarely used, in favor of conda environments. (You’ve actually already created at least one conda environment – you were required to do so in DSC 80.) conda is a package manager that comes with the Anaconda distribution of Python; if you don’t already have Anaconda installed on your computer, you should install it now. conda comes equipped with several packages that are commonly used in data science, like pandas and numpy. It also technically supports installing non-Python packages, making it slightly more flexible than Python virtual environments. With that said, it also interacts with pip, the default Python package manager.
The following 🎥 video describes how to create, export, and import conda environments.
If your project only involves Python, we’re expecting you to use a conda environment and to include an environment.yml file in your repository, so make sure to watch this closely!
More documentation can be found here.
Docker
In the event that your project involves more than just Python packages, conda environments might not suffice. That’s where Docker comes in.
🎥 Overview
Watch the 🎥 video below for a high-level primer on what Docker is.
In short, Docker provides you with a sandbox, in which you can run applications and install packages without impacting other parts of your computer. Specifically:
- A Docker image is a snapshot of a development environment. An image contains everything you need to run an application – all dependencies, configuration, scripts, binaries, etc.
- A container is created using an image. Once you launch a container, you are in the aforementioned sandbox. Per the Docker getting started guide, “a container is simply another process on your machine that has been isolated from all other processes on the host machine.”
Images and containers are closely related, but they’re not the same thing. Here’s an analogy: when Apple released iOS 17, they released an image. When you updated your iPhone to iOS 17 and started using it, you used Apple’s iOS 17 image to launch a container. This is an imperfect analogy, because images are not the same thing as operating systems, but it should hopefully clarify how images and containers are different. Read this article for more details. We can even run multiple containers at a time on a single machine, each using the same or different images.
While this may be the first time you’ve used Docker directly, it’s not the first time you’ve used Docker. Each time you’ve used DataHub or run a launch script on DSMLP, you’ve indirectly specified a Docker image that you’d like to launch, and you’ve done your work inside a Docker container! For instance, here is the Dockerfile that specifies the image that is used when you run launch-scipy-ml.sh on DSMLP. We’ll learn more about Dockerfiles below, but for now, you’ll note that the Dockerfile seems to be installing several Python packages for machine learning, like torch and tensorflow. All large cloud compute providers (like AWS, GCP, and Azure) support containerized applications, and all support Docker.
GitHub Container Registry and DSMLP
Often, you’ll find yourself working with images that already exist for your project. One place to store Docker images is GitHub Container Registry (GHCR), which is what we’ll use here; another place is Docker Hub. For their Docker images, DSMLP used to use Docker Hub, but they switched over to GHCR recently. For instance, ghcr.io/ucsd-ets/datascience-notebook:2023.4-notebook7 is the base image that all other DataHub and DSMLP images are based off of. We’ll build off of it in the Methodology Assignment 6 section below.
When launching a container on DSMLP, you can specify an image from online that you’d like to launch your container in. For instance, suppose we want to launch a container using the base data science image linked above. To do so, we need to find the path for the image. Images on GHCR have paths of the form ghcr.io/<user>/<image>:<tag>. For this image, the user is ucsdets, the image is datascience-notebook, and the most recent tag is 2023.4-notebook7, so we’ll use that. (Other tags are listed below; read more about tags here.)
To launch a container on DSMLP with a specified image, we run
launch.sh -i <image_path> -W DSC180A_FA23_A00
where -i stands for image. So for the purposes of this example, we’ll run
launch.sh -i ghcr.io/ucsd-ets/datascience-notebook:2023.4-notebook7 -W DSC180A_FA23_A00
Great! Upon launch, we’ll be placed in a container whose environment is specified by the image we used. In the future, when you create your own images and upload them to GHCR, you’ll launch servers on DSMLP with the path to your image, instead.
Dockerfiles
Pre-existing images are great, but often you’ll need to create your own image, customized for your project. Images are designed to be layered. That is, I can start with an existing layer and specify what I want to add on top of that layer (packages, languages, files, etc). The existing layer that I started with was itself likely layered upon other pre-existing images. If we continue up the hierarchy, the very first layer that our layer inherits from must have specified an operating system to use – we will exclusively work with Linux distributions; Ubuntu is quite common. (Note that you don’t need a Linux computer to build a Linux image!)
How does one specify what components to include in an image? By writing a Dockerfile. A Dockerfile is a plain text file that contains a sequence of steps that one can use to recreate your development environment. To create an image, you build a Dockerfile. In keeping with the iOS 17 example from earlier, if Apple’s release version of iOS 17 is an image and the copy of it running on my iPhone is a container, then the Dockerfile is the source code Apple wrote to create iOS 17.
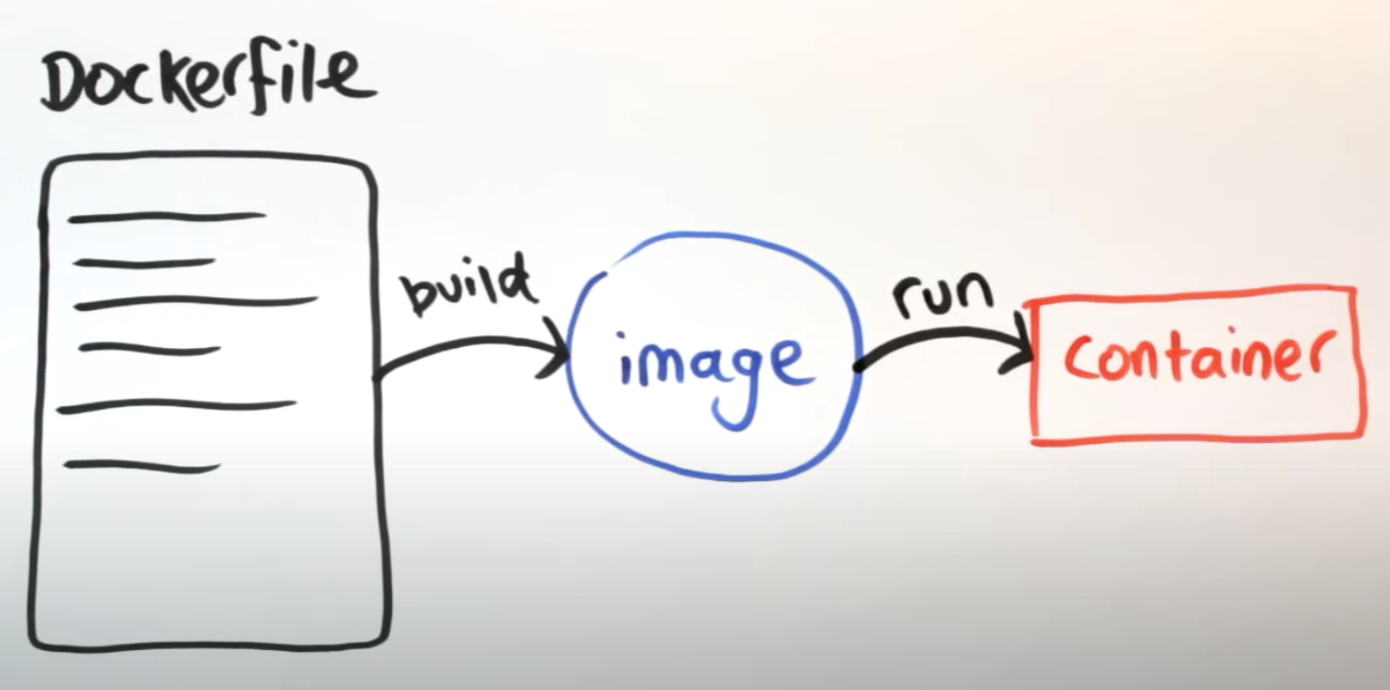
(This diagram was taken from another great video about Docker.)
Let’s look at a very basic example.
Click to show a basic Dockerfile.
FROM ghcr.io/ucsd-ets/datascience-notebook:2023.4-notebook7

USER root

RUN conda install --quiet --yes geopandas
Yes, that’s an entire Dockerfile!
- The first line specifies that we want to start by adopting the
ghcr.io/ucsd-ets/datascience-notebook:2023.4-notebook7image that we looked at earlier. Everything that is part ofghcr.io/ucsd-ets/datascience-notebookwill be included in our new image, too. - The next line specifies that we want to run all subsequent commands as the root (administrator) on the computer.
- The next line installs
geopandasusingconda. Note: this requirescondato be installed in the image. If it’s not, this will error!
A similar-looking Dockerfile can be found here; it is the Dockerfile for the DSC 10 image on DataHub.
Click to show the Dockerfile used for the DSC 10 image on DataHub.
ARG BASE_CONTAINER=ghcr.io/ucsd-ets/datascience-notebook:2023.4-stable
FROM $BASE_CONTAINER

USER root

RUN pip install coverage==5.5 && \
  pip install 'pandas>=0.24, <= 1.5.3' babypandas==0.1.9 pandas-tutor==2.0.3 && \
  pip install otter-grader==3.3.0 && \
  pip install wordcloud==1.8.1

USER $NB_UID
It’s starting from a base image maintained by UCSD ETS (though not the same one as we looked at above), and installing the Python packages needed for DSC 10.
A more sophisticated Dockerfile might look like the following (taken from Aaron Fraenkel’s malware domain a few years ago).
Click to a more sophisticated Dockerfile.
FROM ghcr.io/ucsd-ets/datascience-notebook

USER root

RUN apt-get update && \
    apt-get upgrade -y && \
    apt-get install -y default-jre && \
    apt-get install -y default-jdk

ENV APK_SCRIPT https://raw.githubusercontent.com/iBotPeaches/Apktool/master/scripts/linux/apktool
ENV APK_JAR https://bitbucket.org/iBotPeaches/apktool/downloads/apktool_2.4.1.jar

RUN mkdir -p /usr/local/bin

RUN P=/tmp/$(basename $APK_SCRIPT) && \
    wget -q -O $P $APK_SCRIPT && \
    chmod +x $P && \
    mv $P /usr/local/bin

RUN P=/tmp/$(basename $APK_JAR) && \
    wget -q -O $P $APK_JAR && \
    chmod +x $P && \
    mv $P /usr/local/bin/apktool.jar
While this seems complicated, all it’s doing is:
- Using
apt-get, a package manager on Ubuntu, to install the default Java runtime environment and development kit. - Defining two environment variables.
- Creating a path to place files in.
- Downloading a few scripts from online and placing them in the specified path.
While Dockerfiles can get quickly get complicated, note that you only need to specify what you want to include in your image on top of an existing image. You will almost always start by using one of the images pre-configured by UCSD ETS as a base image.
For a full reference of all the commands that Dockerfiles understand, look here.
Note: Dockerfiles must be named Dockerfile with no extension. Otherwise, Docker Desktop won’t recognize them when you try to build your image.
Once you’ve created a Dockerfile, the next step is to actually build an image from that Dockerfile. We’ll walk you through how to do that below, in the context of a real example.
🎥 Methodology Assignment 6
Let’s get our hands dirty with Docker. In this assignment, you’ll create your own Dockerfile, use Docker Desktop to build the image, push the image to GHCR, and launch a container on DSMLP using that image.
The assignment is based off this tutorial prepared by DSMLP. (Under Step 2 of the tutorial, we’re going to follow Option 1.)
We’ve recorded a 🎥 video that walks through most of the relevant steps.
Step 0: Setup
To complete Methodology Assignment 6, and more generally to create your own Docker images, you’ll need to install Docker Desktop, a client for macOS, Windows, and Linux, locally on your computer. While DSMLP works with Docker, it does not have Docker Desktop installed.
- The video we had you watch earlier mentioned something called
boot2docker.boot2dockeris now deprecated and has been replaced with Docker Desktop. When you install Docker Desktop and pull an image, you essentially install the ability to run Linux-based applications, whether or not you have a Linux personal computer. Pretty cool, right! - When you download and launch Docker Desktop, it’ll prompt you to complete a tutorial. It’s highly recommended that you do this!
- Installing Docker and pulling existing images requires having 5-10GB of free space on your computer. If you don’t have this space available, you can request a DigitalOcean Docker Droplet, which will give you SSH access to a Linux VM with Docker installed. If you go this route, make sure to sign up for the GitHub Student Developer Pack which gives you a $100 DigitalOcean credit. (You could use other Linux-based VMs, like AWS, too.)
- It’s also possible to make Docker images without using Docker Desktop, using GitHub Actions. This is slightly more involved, and we won’t look at that here.
Step 1: Creating a Dockerfile
First, create a folder on your computer. Within it create a file with no extensions named Dockerfile. In it, copy the Dockerfile template from the tutorial linked above.
Then, modify the Dockerfile so that:
aria2,nmap, andtracerouteare installed usingapt-get.geopandasandbabypandas==0.1.5are installed usingcondaorpip.- There is nothing special about these packages; we just need you to install something!
- The last line,
CMD ["/bin/bash"], is uncommented.
Step 2: Creating an Image
To create an image using your Dockerfile, use the following command in your Terminal/command-prompt:
docker build -t dsc-example-docker-image .
Replace dsc-example-docker-image with an image name you choose; your image can be named anything, but it should be something informative to your project.
Make sure Docker Desktop is running on your computer at the same time, otherwise this won’t work! It may take >10 minutes to create the image for the first time. This is to be expected, because it’s pulling ~5GB of files. Subsequent pulls will be much faster.
If you aren’t able to build due to an error with the line RUN apt-get -y install aria2 nmap traceroute, add RUN apt update to your Dockerfile before the aforementioned line.
Step 3: Testing the Image
Once your image is built, run the following command in your Terminal (again, with dsc-example-docker-image replaced with the actual name of your image):
docker run --rm -it dsc-example-docker-image
- To verify that packages you installed via
apt-getare installed, runwhich <package-name>, e.g.which nmap(foraria2, usewhich aria2c). - To verify that packages you installed via
condaorpipare installed, open a Python interpreter and try to import them, or usepip show <package name>.
Step 4: Push the Image to GHCR
Before pushing to GHCR, you’re going to need to tell your Docker client what your GitHub credentials are. Start by creating a new (classic) personal access token that has permission to read, write, and delete packages. Then, in your Terminal run
export CR_PAT=9q30thpalagekaef
with 9q30thpalagekaef replaced with your token (that’s not a real token, don’t worry). Then, run
echo $CR_PAT | docker login ghcr.io -u surajrampure --password-stdin
with surajrampure replaced with your GitHub username.
Now, you’re ready to push your image to GHCR. Start by using docker tag to specify a path for your image on GHCR:
docker tag dsc-example-docker-image ghcr.io/surajrampure/dsc-example-docker-image
Here, both dsc-example-docker-image and surajrampure need to be replaced with your desired image name and GitHub username, respectively.
Finally, run:
docker push ghcr.io/surajrampure/dsc-example-docker-image
This should take a few minutes, but after, you should be able to navigate to your GitHub profile, click “Packages” at the top, and see dsc-example-docker-image as a private package there. Click the package, click “Package Settings” on the right, and at the bottom, turn it into a public package. This will allow us to access it from DSMLP.
Step 5: Use the Image on DSMLP
Log onto the DSMLP jumpbox server. From there, run:
launch.sh -i ghcr.io/surajrampure/dsc-example-docker-image -W DSC180A_FA23_A00
but with ghcr.io/surajrampure/dsc-example-docker-image replaced with the GHCR URL of your Docker image.
Test out your environment on DSMLP – can you start python and import babypandas?
Step 6: Submitting
Submit your assignment to Gradescope by turning in the path to your image on GHCR (e.g. ghcr.io/surajrampure/dsc-example-docker-image). Don’t include the tag (i.e. :latest). We will pull your image and test whether it meets the requirements stated above. You will not see an autograder score right away.