🛠 LaTeX, Markdown, and GitHub Pages
Methodology Lesson 7 + Methodology Assignment 5
This week’s Methodology Lesson and Methodology Assignment are combined into a single document, structured as a tutorial. The tutorial is made up of two parts:
- LaTeX: Here, you’ll be exposed to the basics of the LaTeX typesetting system. You’ll complete a short activity that requires you to replicate a hand-written document using LaTeX, and will be introduced to the LaTeX template that you’re required to use for your Quarter 1 Project report, Quarter 2 Project Proposal report, and Quarter 2 Project report.
- Markdown and GitHub Pages: Here, you’ll learn how to create and host a static website using GitHub Pages. You’ll complete a short activity that requires you to create a public website on which you answer some reflection questions. This is to prepare you for the website you’ll need to make for your Quarter 2 Project next quarter.
There are two “tasks” for Methodology Assignment 5, one for each part. You should submit your work for both tasks to the Methodology Assignment 5 portal on Gradescope by Monday, November 27th at 11:59PM. You have a bit more time to work on this MA than previous ones given the holiday and the assignment’s length. Post questions with the assignment on Ed.
Part 1: LaTeX
Introduction
From The LaTeX Project’s website:
LaTeX is a high-quality typesetting system; it includes features designed for the production of technical and scientific documentation. LaTeX is the de facto standard for the communication and publication of scientific documents. LaTeX is available as free software.
LaTeX is based on TeX, originally developed by Donald Knuth, the “father of the analysis of algorithms,” in 1978. While LaTeX can be used to create entire documents – and you’re going to use it for this purpose shortly – the easiest way to use LaTeX is to use it to format mathematical formulas in places you’re already used to writing, like in a Jupyter Notebook, or any other environment that uses Markdown (see more in Part 2). To format formulas – that is, to include formulas among words in a sentence – surround the formulas with $single dollar signs$, if you’d like them to appear inline with other text, or with $$double dollar signs$$, if you’d like them to appear on their own lines.
For example, if you placed the following in a Jupyter notebook text cell,
If $x_1, x_2, ..., x_n$ are positive real numbers, then

$$\frac{n}{\sum_{i = 1}^n \frac{1}{x_i}}$$

is their harmonic mean.
the rendered output would look like:
If \(x_1, x_2, ..., x_n\) are positive real numbers, then
\[\frac{n}{\sum_{i = 1}^n \frac{1}{x_i}}\]is their harmonic mean.
A more sophisticated way of using LaTeX is to format entire documents. We do this a lot — many DSC exams and homeworks you’ve taken were authored in LaTeX. To author documents in LaTeX, you need to have access to a LaTeX distribution. One way to do this is to download a distribution, like MacTeX, to your computer, but this can be a little finicky.
An easier way to get started with creating documents in LaTeX is to use Overleaf. Overleaf allows you to create .tex files (the format used for LaTeX documents) and upload supporting files and images and render a preview of your documents directly in your browser. Overleaf’s free tier also allows you to collaborate with other users just by sharing with them a link to your project; think of it like Google Docs for LaTeX. (I personally write my DSC 10 and DSC 80 exams in Overleaf, and don’t even have a LaTeX distribution installed on my computer.)
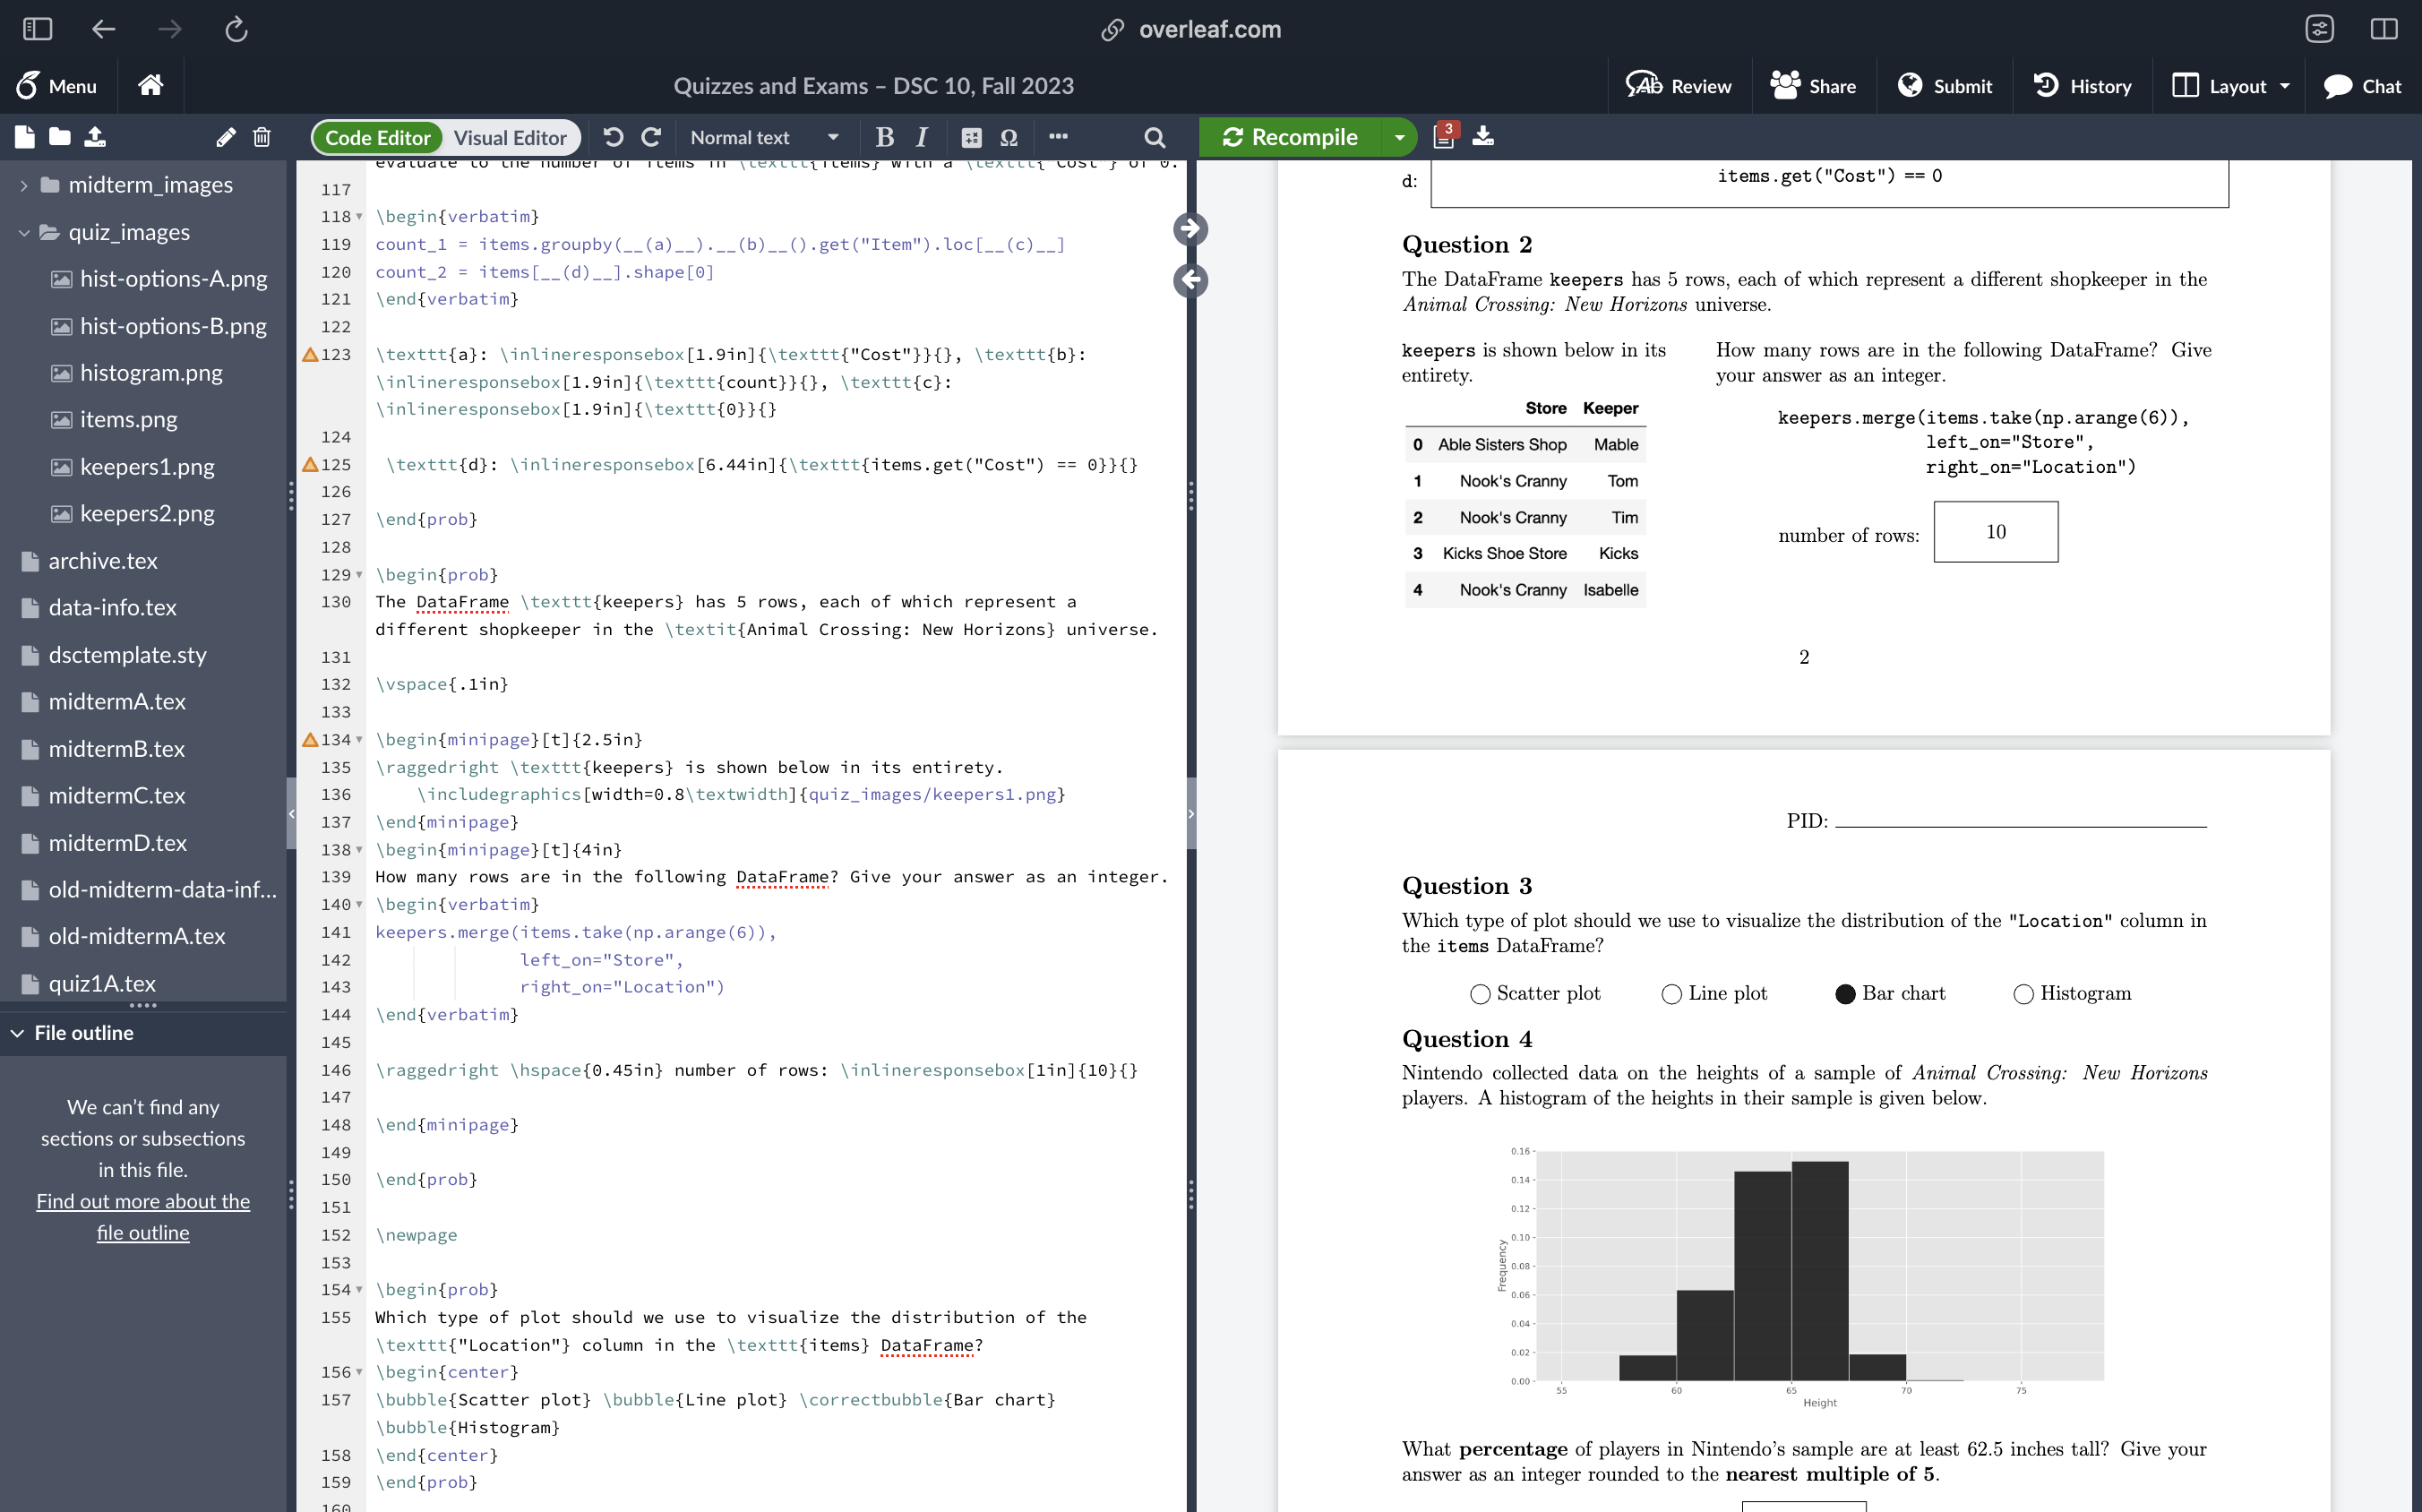
The Overleaf UI.
You’ll need to make a free Overleaf account, both to work on your capstone reports and to complete this Methodology Assignment. Do that right now if you don’t already have one.
Once you have an Overleaf account, you’ll need to create a new blank project for Methodology Assignment 5. To do so, you can go to overleaf.com/projects, click “New Project” in the top left, and then click “Blank Project.” Enter “DSC 180A Methodology Assignment 5” as the project name. You’ll be brought to an environment that looks just like this one:
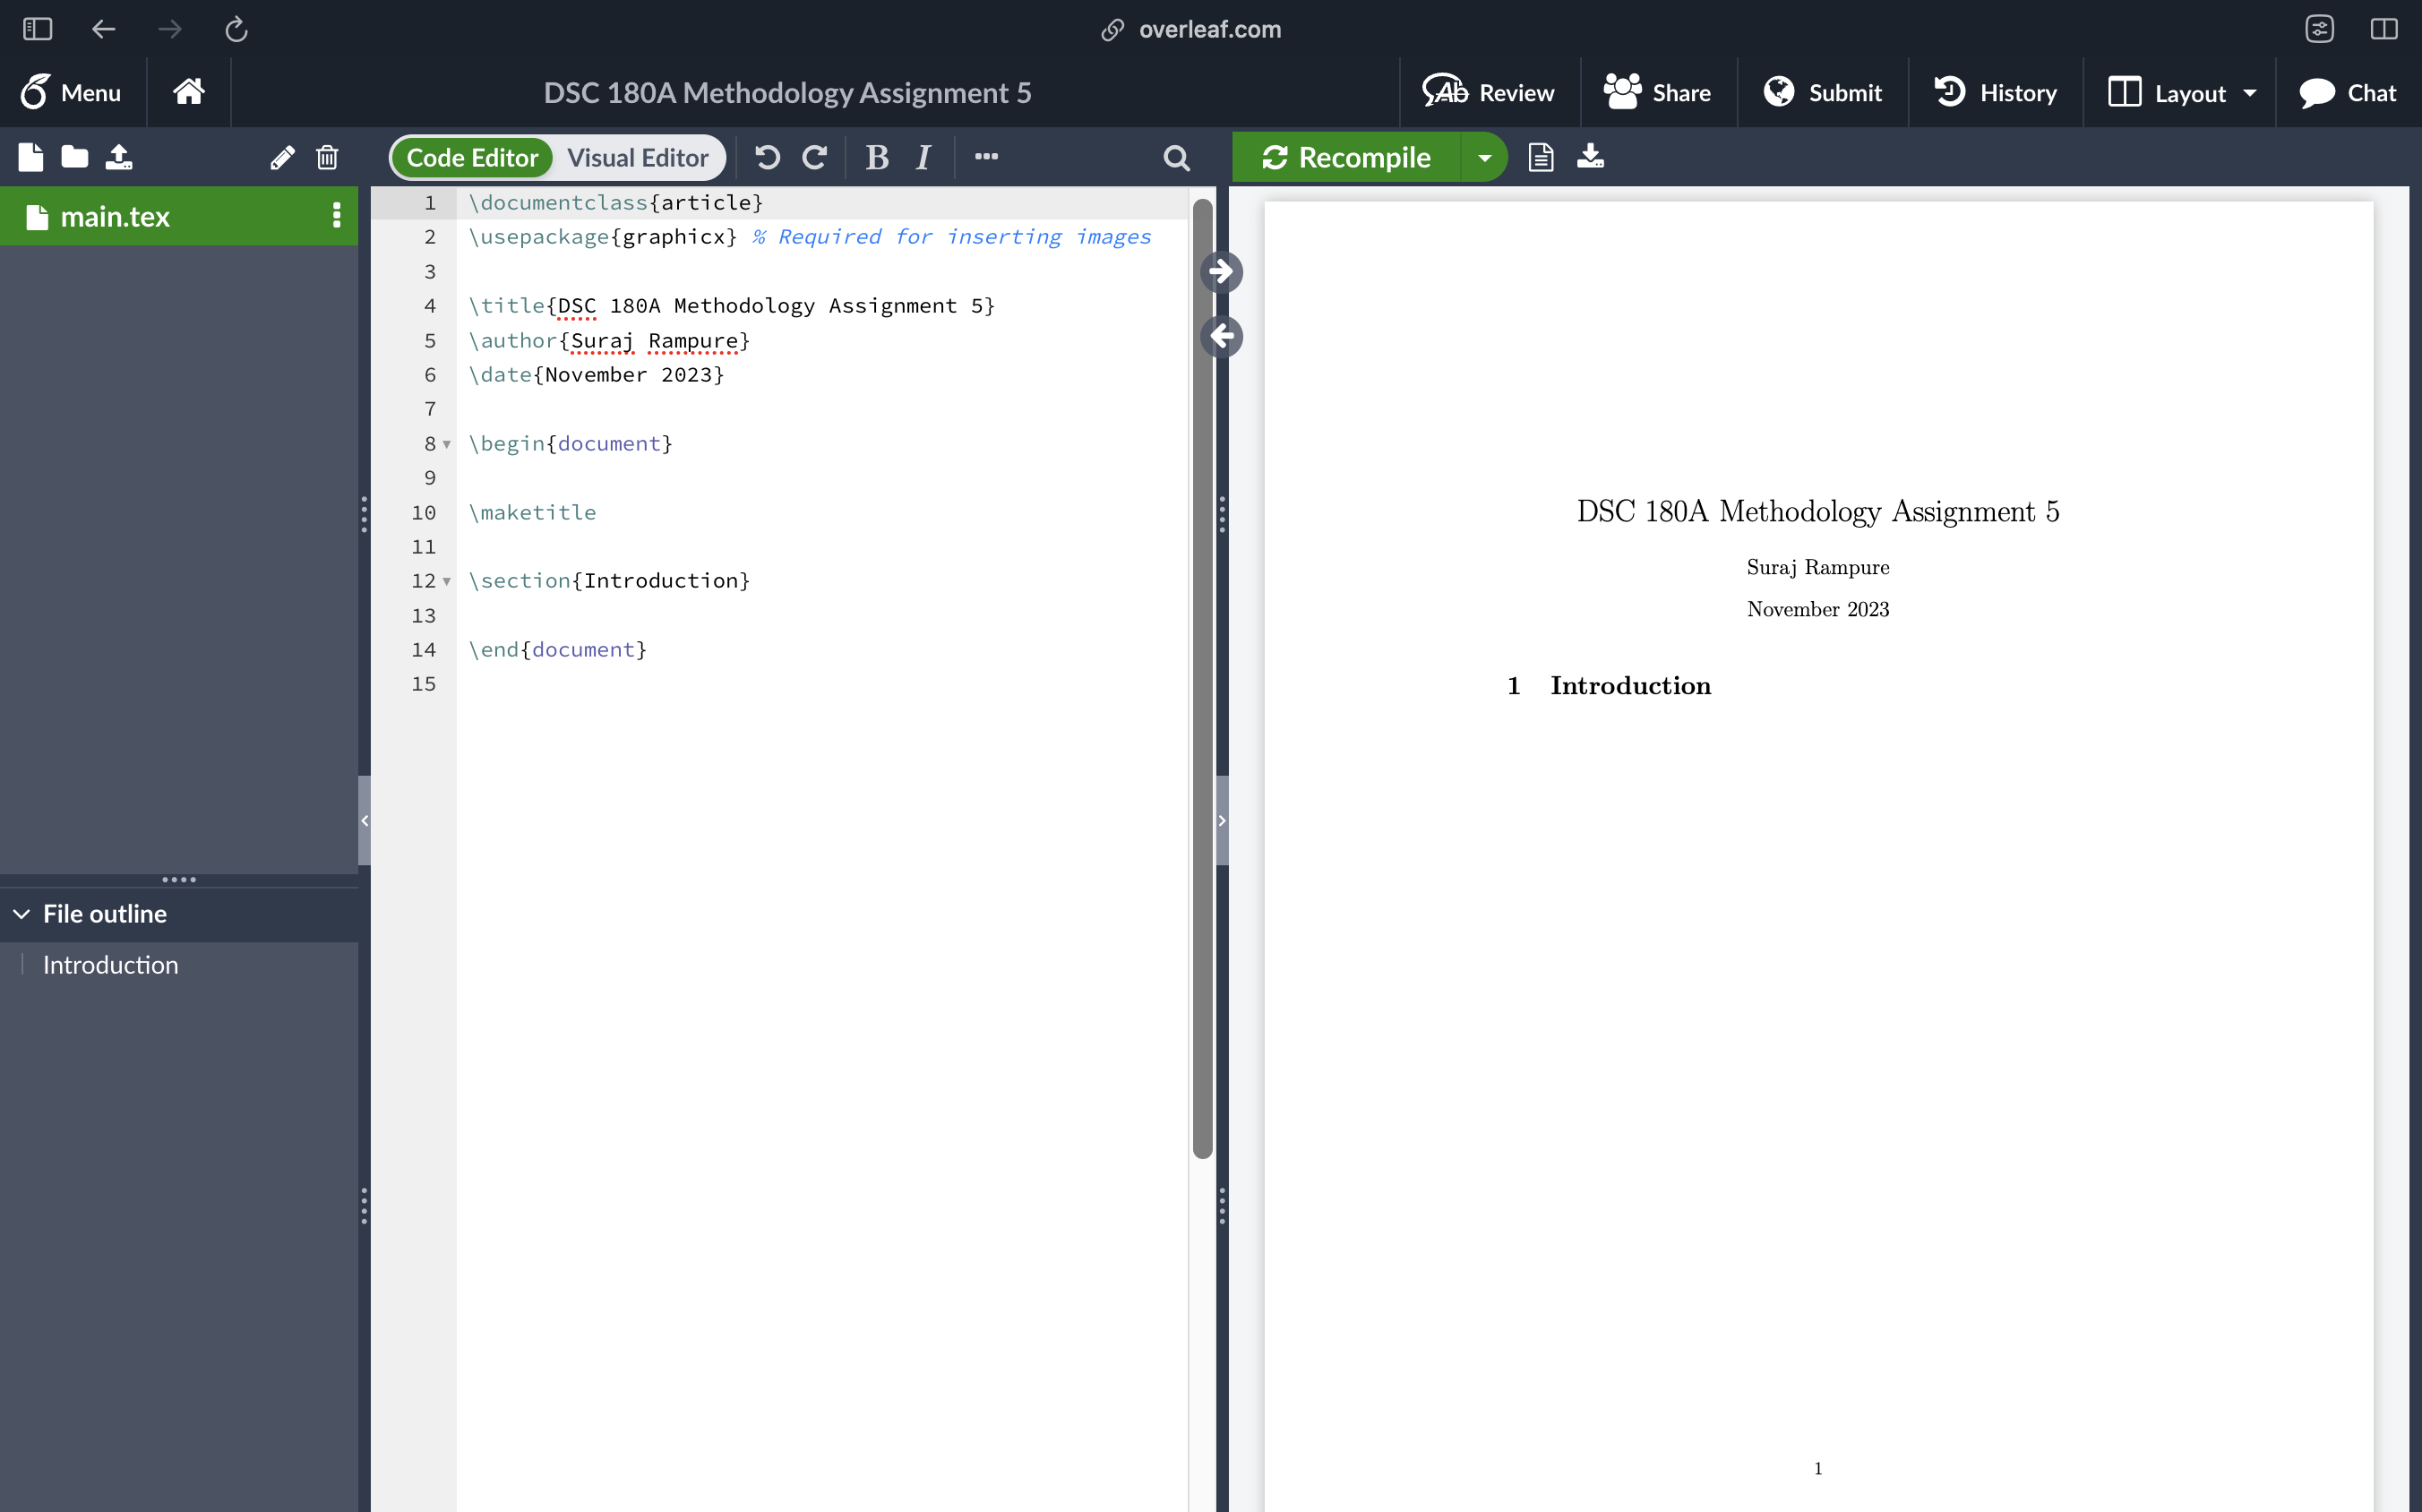
A blank project titled "DSC 180A Methodology Assignment 5."
As you enter text on the left in main.tex, you can hit Control/Command + Enter to re-render the PDF corresponding to main.tex. Keep this project open in a separate tab, you’ll need to come back to it below.
Examples and the Capstone LaTeX Template
Now that you have a place to write and render LaTeX, it’s time to get to writing! You might not already know how to format any mathematical formulas in LaTeX, and that’s fine. This cheat sheet lists many of the mathematical symbols LaTeX knows about, but if you’re ever unsure of how to format something, you’re only one Google search (or ChatGPT query) away.
Another useful resource is this official tutorial from Overleaf; the slides for Part 1 can be found embedded below.
As for formatting actual documents, a good way to get started is to use templates created by others. That’s what we’re going to require you to do in the capstone. In fact, we’ve prepared a LaTeX template on Overleaf that you’re required to use for your Quarter 1 Project report, Quarter 2 Project Proposal report, and Quarter 2 Report! One of the benefits of having everyone use a template, other than exposing you to LaTeX, is ensuring some sort of uniformity in the submitted reports. Academic conferences do this all the time.
Access the LaTeX template on Overleaf here.
The link above is set to read-only. To make your own copy of the template, click the “Menu” button in the top left, then click “Copy Project.” This will bring an editable copy of the template into your Overleaf account. To share the project with your group members, click “Share” in the top menu bar, turn on link sharing, and send the edit link to your group members.
Once you open the template, in report.tex (the file with all of your content), you’ll see many lines of text in blue. Those are instructions from us; remove them or comment them out with % as you actually edit the template. Your actual submissions should not have any blue in them.
As mentioned above, the template mostly exists for style purposes. Not all headings provided in the template will actually be useful for you; you can add or remove headings as you please, and the headings you end up using are up to you and your mentor. Look to the “Anatomy of a Scientific Paper” section of Methodology Lesson 4 for guidance on which headings to use. Additionally, the top of the template asks you to put links to a website and code; for your Quarter 1 Project, you won’t link a website, but will link your code; for your Quarter 2 Proposal, you won’t link either of these; for your actual Quarter 2 Project, you’ll link both of these.
Section 6 of the template contains several examples on how to format various things (bold text, code, lists, formulas, images, algorithms, etc.) in LaTeX – read it now before working on the exercise below!
The end of the template contains a “References” section, whose contents are defined in reference.bib. Many conference websites format citations in BibTeX that you can copy into reference.bib directly; you can also search for the paper on Google Scholar, click “Cite”, and then click ``BibTeX” (here’s an example).
If you’re curious, the reason that the font, margins, colors, etc. in this document are different than that of the default document you created is due to the inclusion of styles/dsc180reportstyle.sty. .sty files allow you to custmomize the appearance of a LaTeX document. You don’t really need to tweak with this.
Methodology Assignment 5, Task 1
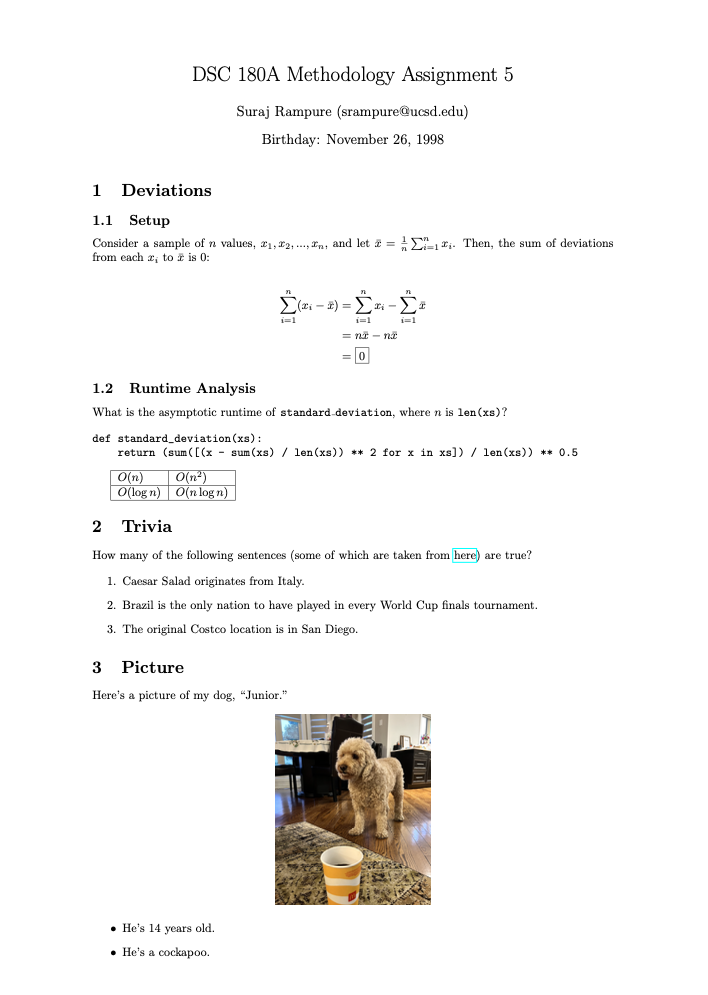
The first task in Methodology Assignment 5 is to re-create the PDF below in the blank project named “DSC 180A Methodology Assignment 5” you created above. You should do this individually.
Some guidance:
- Make sure to re-create the document exactly. Make sure it fits exactly on one page. You’ll need to use several different commands and environments. Most of them are illustrated in the Capstone LaTeX template, though you may need to do a little bit of Googling (this is intentional)!
- There are some details you’ll need to change: change
Suraj Rampure,srampure@ucsd.edu, andNovember 26th, 1998to your full name, UCSD email, and birthday, respectively.
- There are some details you’ll need to change: change
- You’ll need to import a few packages in the header of
main.tex(before\begin{document}) using\usepackage:- The default margins are too large. To fix them, use
\usepackage[a4paper, total={6in, 11in}]{geometry}. - The “here” in “some of which are taken from here” is a hyperlink to this website. To enable hyperlinks, use
\usepackage{hyperref}. There are several articles online which show you how to use the\hrefcommand (imported fromhyperref) to make hyperlinks. - To align the equations in section 1.1, you’ll need to use the
align*environment, defined by\begin{align*}and\end{align*}. To use thealign*environment, though, you’ll need to use\usepackage{amsmath}. (AMS stands for the American Mathematical Society.)
- The default margins are too large. To fix them, use
- In Section 2, to make the table with asymptotic runtimes, use the
tabularenvironment. You’ll probably need to do some experimenting to get it to look exactly right; don’t hesitate to post on Ed if you’re stuck. This might be the trickiest part. - In Section 3, you can either use this picture and include the picture of my dog, Junior, or use a different picture of your own pet/favorite animal. If you use a picture of a different animal, replace the two bullet points about Junior with two bullet points about your chosen animal.
- If you try to write
"Junior.", you’ll see that the quotes appear strangely. Instead, you’ll need to use``Junior." - The
\includegraphicscommand takes two arguments, meaning you call it like\includegraphics{arg1}{arg2}.arg1, if you provide it, should be a specification of how big the image should be. Try using something likewidth=0.8\textwidth. What happens? Experiment until the entire document fits on a single page.arg2should be a local path to the image; you can’t link to images on the internet in LaTeX, you’ll have to upload the image you want to Overleaf first and provide a relative path.
- If you try to write
Once you’re done, download your PDF by clicking the following button.

Once you’re ready to submit, upload both your main.tex and PDF to Task 1 in the “Methodology Assignment 5” portal on Gradescope.
Fun fact: LaTeX is actually Turing complete!
Part 2: Markdown and GitHub Pages
Markdown
Markdown, like HTML (and LaTeX, to some degree), is a markup language. This means that we can use it to format plain-text. As mentioned at the start of Part 1, Jupyter Notebook text cells use Markdown, so you’ve likely already used Markdown to format text.
For example, if you placed the following in a Jupyter notebook text cell,
**Hey there!** My name is [Suraj Rampure](https://rampure.org).
- I live in San Diego, California.
- This quarter, I'm teaching DSC 10 and DSC 180A.
- Here's a function that calculates $\frac{n}{\sum_{i = 1}^n \frac{1}{x_i}}$:

```py
def harmonic_mean(xs):
	return len(xs) / sum([1 / x for x in xs])
```
the rendered output would look like:
Hey there! My name is Suraj Rampure.
- I live in San Diego, California.
- This quarter, I’m teaching DSC 10 and DSC 180A.
- Here’s a function that calculates \(\frac{n}{\sum_{i = 1}^n \frac{1}{x_i}}\):
def harmonic_mean(xs):
	return len(xs) / sum([1 / x for x in xs])
Jupyter Notebook text cells aren’t the only place you’ve already written Markdown – the README.md file in every GitHub repo you’ve made is also written in Markdown.
Websites
The point of the second half of this lesson is not to teach you how to use Markdown. There are several other resources dedicated to that, from Markdown Guide’s Getting Started tutorial to the Basics page on Markdown creator John Gruber’s website.
Rather, it’s to show you how to build websites using Markdown. This is because you’re required to build a website for your Quarter 2 Project next quarter, and knowing Markdown will allow you to build your website quickly. Here, we’ll just look at how to make such a website, not what content to put on it. We’ll discuss the purpose of your Quarter 2 Project website when the time comes.
Before we get started, it’s worth noting that there exist a variety of no-code platforms for building websites, like Google Pages and Squarespace, that people use frequently. Those tools serve their purposes, but you cannot use them for your capstone websites; instead, you must create your websites using code, and you must be able to store that code in a public GitHub repository. By owning your website’s code yourself, you can choose the hosting service you’d like to deploy it on, and are protected in any sudden changes in access (for instance, you lose access to UCSD Google Pages after you graduate).
That is not to say that you must write every single line of HTML, CSS, and Javascript yourself – while you’re certainly free to, you can instead use existing templates, or use frameworks that generate HTML from other formats that are easier to write. We’ll point you in the direction of using Jekyll, a framework that integrates with GitHub Pages that takes a set of Markdown files and creates a website, and while you have to use Jekyll for Methodology Assignment 5, you can use whatever framework you’d like for your actual Quarter 2 Project website.
There are two general types of websites – static websites and dynamic websites. Read this page for an excellent example that distinguishes the two.
- Static websites run all computation in the client (web browser). They are created using HTML (content), CSS (styling), and Javascript (interactivity), though remember that you can create HTML, CSS, and Javascript using Markdown through frameworks like Jekyll. Static websites are not only easier to get up and running, but are also free (e.g. through GitHub Pages) or very cheap to run.
- Dynamic websites require server-side computation. In summary, the client (web browser) sends a request to a server, which sends a response back to the client. To run a dynamic website, you must either run and maintain a server of your own or pay for a cloud hosting service; either way, as your website becomes more popular, your costs will increase. Examples of dynamic websites include websites that access information stored in databases and websites that allow users to upload datasets and return predictions from an ML model.
Unless your project involves creating a web-based product (e.g. a dashboard or marketplace), your project website should be a static website to minimize overhead. You’d be surprised at the level of interactivity that is possible with a static webpage (including model execution – look at Tensorflow JS, for instance.)
For instance, here is an interactive map created with plotly that students in DSC 80 need to create in Project 2. You can drag and zoom with it.
If you think you need a dynamic webpage, you likely have already looked into how to set one up, but feel free to contact methodology staff if you have any questions.
GitHub Pages
GitHub Pages hosts static websites for free; I personally make heavy use of this feature and encourage you to as well.
- Each GitHub user is allowed to create one personal website, published at
<username>.github.io.- For instance, the capstone course website, dsc-capstone.github.io, is the personal website for the GitHub user dsc-capstone; the code for the website is stored at github.com/dsc-capstone/dsc-capstone.github.io.
- As another example, my personal website is at surajrampure.github.io, and its source code is in github.com/surajrampure/surajrampure.github.io. Since I have a custom domain setup, the link appears as rampure.org, however.
- Each project you create can have a project website, published at
<username>.github.io/<reponame>.- For instance, the site for the repository github.com/dsc-capstone/showcase-23 is hosted at dsc-capstone.github.io/showcase-23, and because dsc-capstone.github.io uses the custom domain name dsc-capstone.org, this appears as dsc-capstone.org/showcase-23.
You may opt to host your site out of a separate branch in your existing public repository, like gh-pages, or create a separate repository solely for your website.
To create the most basic possible page on GitHub Pages:
- Create a repository (or branch in a repository) named
<project>. - Add, commit, and push a basic
index.htmlfile. - Go to your repository’s settings, then click “Pages” on the left, and select a source and branch. (See Publishing from a branch for more details.)
We recommend you don’t do this, since it’s likely more work than is necessary, but you’re free to. If you want to go this route, you may find the GitHub Pages landing page to be helpful.
GitHub Pages and Jekyll
Jekyll is a Ruby-based tool that takes a set of Markdown files and images and turns it into HTML automatically. It allows you to create a static website by mostly editing Markdown files. It’s particularly useful for websites that have multiple pages, but it’s also useful when you don’t want to worry too much about formatting.
GitHub Pages has Jekyll installed on its servers; this means that all you have to do is push Markdown code and your assets to a repository, and GitHub will handle the deployment.
To create a Jekyll-based site using GitHub Pages, follow the instructions here. In short, you’ll have to:
- Create a repository (or branch in a repository) named
<project>. - Go to your repository’s settings, then click “Pages” on the left, then select a source and branch.
Here is a barebones example of a Jekyll site; you can view the source code here.
- Note that the
_config.ymlfile specifies that the site’s theme iscayman. There are several existing themes; browse them here and read more about changing themes here.
To see the source code for a more complicated Jekyll site, in addition to looking at last year’s capstone websites, you can look at the source code for dsc-capstone.github.io.
- The
_layoutsfolder contains templates for various kinds of pages. - In most pages’ source code, like this one (meta!), you will see front matter, delimited by
---, at the top of the page. Front matter provides metadata for a particular page; for instance, it may specify which template in_layoutsto use.
More examples are linked below.
- Aaron Fraenkel’s malware domain site; given the link to the site’s repo, can you find the site itself?
- GitHub Pages’ gallery of sites.
The instructions above only show you how to configure a Jekyll site directly on GitHub Pages. If you’d like to render your Jekyll site locally, you’ll need to install Jekyll (which means you’ll also need to install Ruby). I recommend setting this up, as it’ll make it easy to make large changes to your site at once. Instructions can be found here; click the link corresponding to your operating system.
Here are a few additional resources for creating sites on GitHub Pages.
- The official GitHub Pages documentation.
- Jonathon McGlone’s through, from the start, tutorial with demo code.
- Jekyll documentation, mentioned above.
- More examples of visualization tools by TA Kengchi Chang.
Methodology Assignment 5, Task 2
The second task in Methodology Assignment 5 is to create a barebones static website using GitHub Pages and Jekyll, and use it to answer a few questions. You’ll do this individually.
First, create a public repository named DSC180A-Methodology-5. Then, using the instructions above, enable GitHub Pages for your site, using Jekyll. Add a _config.yml file for the site that specifies the theme that you’d like.
Then, create the file index.md, and in it, add:
- Your name and UCSD email address, formatted however you’d like.
- The name of your section and your mentor, formatted however you’d like.
- The answers to the following four prompts, which are meant to help you brainstorm for your Quarter 2 Project Proposal, due on December 11th. For each prompt, state the question that you’re answering in bold and write your answer immediately underneath on a new line. Make sure you’ve familarized yourself with the Quarter 2 Project Proposal specifications before proceeding!
- What is the most interesting topic covered in your domain this quarter?
- Describe a potential investigation you would like to pursue for your Quarter 2 Project.
- What is a potential change you’d make to the approach taken in your current Quarter 1 Project?
- What other techniques would you be interested in using in your project?
Note: You should answer these prompts individually. If you are in a domain where the Quarter 2 Project is already determined, this is still a useful (and mandatory) exercise. Do not just answer with the project you think you are doing; give the questions thought and respond with possible related projects that you could work on if you get to go further than expected with your current project or if your current project doesn’t pan out. All data scientists must have the ability to develop topics of investigation given a dataset and some domain knowledge.
Make sure your site renders properly and that other people can see it, given the link.
Once you’re ready to submit, upload both a link to your public website and your index.md to Task 2 in the “Methodology Assignment 5” portal on Gradescope.
We’d also like you to reflect on whether or not your domain is on track to complete your Quarter 1 Project deliverables and propose something interesting and feasible for Quarter 2. If you’re concerned about your domain’s progress, email Suraj ASAP!